Thursday, 26 May 2011

The Comfy Chair...

I was given the comfy chair to look at with Heather and Steph which would be going in the drawing room. In the book the comfy chair is by the small table in the centre of the room with the loveseat and the pouffe. This is what I found through my research:


(Figure 15)


(Figure 16)


(Figure 17)


(Figure 18)


(Figure 19)


(Figure 20)


(Figure 21)


(Figure 22)


(Figure 23)


(Figure 24)


(Figure 25)


Looking over what we found in our research it was clear that we had a lot of things to consider when finding the right sort of chair.

Since we were making a comfy chair a sufficient amount of padding would be needed on the cushion to give that relaxing appeal. The chairs in figures 15 and 16 don’t have a sufficient amount of cushioning on them so we didn’t think that design would be suitable for our chair. The seats in figures 17 and 25 are much more sumptuous and comfy looking so we decided to go for more of that look. We decided that we wanted to include arms on the chair to elaborate on the sense of comfort. I found that some of the arms on the particularly grander chairs have a small padded section along it, this was appealing to us.

Even though we had a desired look in mind for our chair we knew that we would have to find a chair ourselves that portrayed all of these aspects, this was going to be the difficult part. Taking the amount of time we had remaining to complete the chair in consideration the decision to buy an already made chair was made. This was because neither of us felt confident enough to attempt at carving the shapes and intricate details that would have been needed to go into the frame of the chair.


Figures 15- 18 - Davis, Frank 1958 A picture History: Furniture, London Great Britain, Vista Books, Longacre Press Ltd

Figures 19- 21 - http://luxury-ideas.org/home-lux/category/furniture-designs/page/12/

Figures 22- 25 - http://www.sweetpeaandwillow.com/Chaise-Longue-%7C-Chairs-Bedroom-Chairs/c21_34/index.html

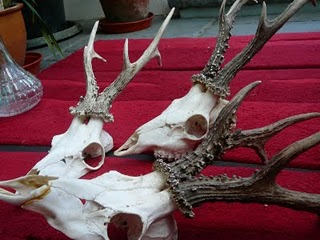

Throughout the weeks people were bringing in all sorts of knick knacks to go in the rooms, from vases to candle holders...


Sarah managed to bring in a set of deer skulls which would have been a popular choice of wall hanging in the 19th century. She was able to mount these on a wooden shield which was varnished.


Card games that were mentioned in the book.


And other various knick knacks...


Glass tumblers because Russians are known to favour their drink...

The flats were screwed together from behind, the fronts had to be lined up and totally flush before the screws could go in. Me, Vicky and Jenny made numerous support braces that would attach to the back of the flats for extra support. these were constructed of two lengths of pine screwed together at a right angle again making sure the edges were flush. These could be any length as they weren't size specific for going across the backs of the flats. Once they were all in position and screwed together, the support braces braces could be attached. They were positioned in rows, along the top and middle of the flats.


On the inside of the rooms the the bottom 3ft of the flats was painted with a mahogany wood effect, this was to give an under coat for the paneling. It was also questioned whether or not to apply artex to the surface before we painted it to conceal the grain natural grain of the wood below but we got away without doing so as we decided that the panels were going to cover it up anyway. The upper half was wallpapered a neutral cream colour by Rhyan, Jenny and Vicky. The cream was to be painted green in the study and pink in the drawing room.


Whilst this was taking place the chaise lounges was being constructed by Nicole and Sarah and Fiona was beginning the tiles for her fireplace. The tiles were made of small pieces of mdf and the overall effect once they would be varnished is to give the impression that they are ceramic. Since she had a lot of tiles to do and there wasn’t enough space for us all to begin our specialised bits of furniture we all chipped in to help her out with the production of the tiles.


Nicole and Sarah working on the chaise lounges.


There were many processes for us to help with the production of the tiles. I helped out by sanding some of the tiles down for her, repainting it a white base colour, tracing out the outlines of the characters that went in the middles including cats, birds, flowers, rabbits and a chicken/woman, painting over the traced drawings with a blue paint and then glazing them later on. This would have been a very tedious job for Fiona if she would have had to do it all on her own and it would have taken too long for her to complete anything else.


The tiles being glazed.


Traced picture on white wooden tiles.


Assembling the flats...

Before we could begin to construct the 8x4’ flats we had to be shown how to make them with Henry.

We started by taking 8’ pieces of wood and cutting them up into 5 4’ pieces, with an additional 2 widths of wood off the ends. We then took 2 pieces of 8’ wood and placed the 4’ pieces evenly along them in order to brace our flats. These bits were drilled into place making sure we marked certain ends so we knew we were keeping the flats flush. These were made accurate by the use of set squares and tape measures. We had to be careful not to split the wood when we drilled it, if this happened we had to remove the screws and redo it above or below the previous hole. We had to start at one end and make our ways across to the other ends in order to keep the wood flush, this would take quite a few of us to achieve this.

Once the frame was successfully fitted together we could apply the plywood skin. The surface of the frame was covered in PVA glue. The skin was then lined up with the frame and placed on top. An air pressure nail gun was used to secure the skin to the frame. This bit was really difficult because if the frame wasn’t exactly flush then we had stress the wood and try and pull it over so it fit the edges nicely. Nails were also punched in through the middles of the skin where the support braces were and this was done by measuring where they were underneath using a piece of wood. If the skin turned out to be too big for the frames we could remove them with the wood router. When using the router it would take two people, one to controlling the router and another to be close by with a vacuum to remove the large quantity of sawdust from the air quickly. Goggles and dust masks were required.


Rob is feeder the wood through the saw as Callum lowers the blade to cut it at the desired lengths. I am quickly removing the wood from the saw bed and piling them out of the way for collection. Goggles were worn as were sound mufflers.


Chatsworth House

As part of my research (and for my leisure) I made a visit to Chatsworth House. Chatsworth House, situated in Derbyshire, England, is the home to the Duke and Duchess of Devonshire and attracts people from all over the world every year. The building started in 1552 Sir William Cavendish and his wife Bess of Hardwick and most of it was completed by 1707. Throughout the decades, right up to 1834 the house had been remodelled and reshaped, inside and out. Throughout Chatsworth house there are paintings, fine pieces of furniture and tapestries that have been collected through time at the house.

As I was walking round I found lots of furniture that could be relevant to the project for inspiration.


One of the lights - Small motifs and patterns down the 'arms', could be considered for the lights in the rooms.


Patterns on fabric could be useful inspiration for chair...


Bedroom interiors - colours and patterns could be translated in to the study...


Ideas for the pouffe?


More inspiration for the lighting


Back of chair...


This chair really inspired me for the chair design. I really like the colour of the upholstery and I like the intricate detailing on the top of the chair. The design along the wooden frame resembles the look of the weeping willow - could be related to my chair...


Detailing on the chandelier, intricate beading and glass work.


Other possible chair designs.


Knick knacks - Japanese plates, very popular in Baroque interior. These were mentioned in the story.


Knick knacks again...


Detailing around the door.


Desk chair - I have noticed how the cushions are really thin.


Tall walls and grand fireplaces - fireplace not relevant to Russian fireplaces.

Who is making what?

When all the furniture was decided upon we each chose two things that we would like to make for the room, this included wallpapering, doors and windows.
This was the final decision:

Study
Screen - Sarah/Rob
Small Table - Heather/Lauren
Chaise Longue - Nicole/Nuria
Desk - Sarah/Chloe
Desk Chair - Nicola/Kirby
Bookshelf - Chloe/Dan

Both Rooms
Lighting - Rob/Kirby
Curtains - Lauren/Nicole
Doors - Fiona/Callum
Windows - Jenny/Vicky
Panelling - Dan

Drawing Room
Whatnot - buying this
Sofa - Rhyan/Vicky
Table - Abbie/Nicola
Pouffe - Abbie/Steph
Comfy Chair - Steph/Heather
Cabinet - Nuria/Dan
Chimney - Callum/Fiona
Rug - Buying or borrowing this

New and final room plans

Once we had got a rough idea of the room we wanted to get a feel for the amount of space we would be working with so we marked out the room on the floor with masking tape and we stood in certain places of the room where the furniture would be
to see how much room we would be dealing with.


We planned out the room once again on the white board with the new room dimensions and organised the furniture accordingly so it fit. An autocad drawing of the revised plan was conducted also...


Next we worked out how many flats we needed to create the room. Each flat measures 4x8 ft so we divided the rooms into pieces to work out the number flats that would be required.
Here is the list of flats needed for both of the rooms:

17 - 4x8'

7 - 2x8'

1 - 3x8'

1 - 3 1/2x8'

1 - 1 1/2x8'

Headers and footers needed for the windows and the doors:

Headers -

2 - 4x1 1/2'

Footers -

3 - 3x3'


The next step would be to construct the flats and start putting the rooms together.